How to Make Candles at Home
By Nadia Colbert, candle maker since 2014 · Updated
Making a candle at home is four operations in a row: melt the wax, anchor the wick, stir in scent and color, then pour and wait. Every step below is written against the contents of one box, so you can follow it with the wax and hardware already on your table instead of hunting for parts halfway through.
In this guide
What you need to make candles at home. This section lists everything the kit supplies and the two things you have to bring yourself.
Melting the wax. Here is how the double boiler method works and why it beats heating wax directly.
Anchoring and centering the wick. The glue dots and the wooden centering devices do two different jobs.
Adding fragrance oil and dye. Timing matters more than quantity when you stir scent into soy.
Pouring, cooling, and curing. This is where patience does most of the work.
Fixing the four problems beginners hit. Tunneling, sinkholes, weak scent throw, and a wick that drowns.
What You Need to Make Candles at Home
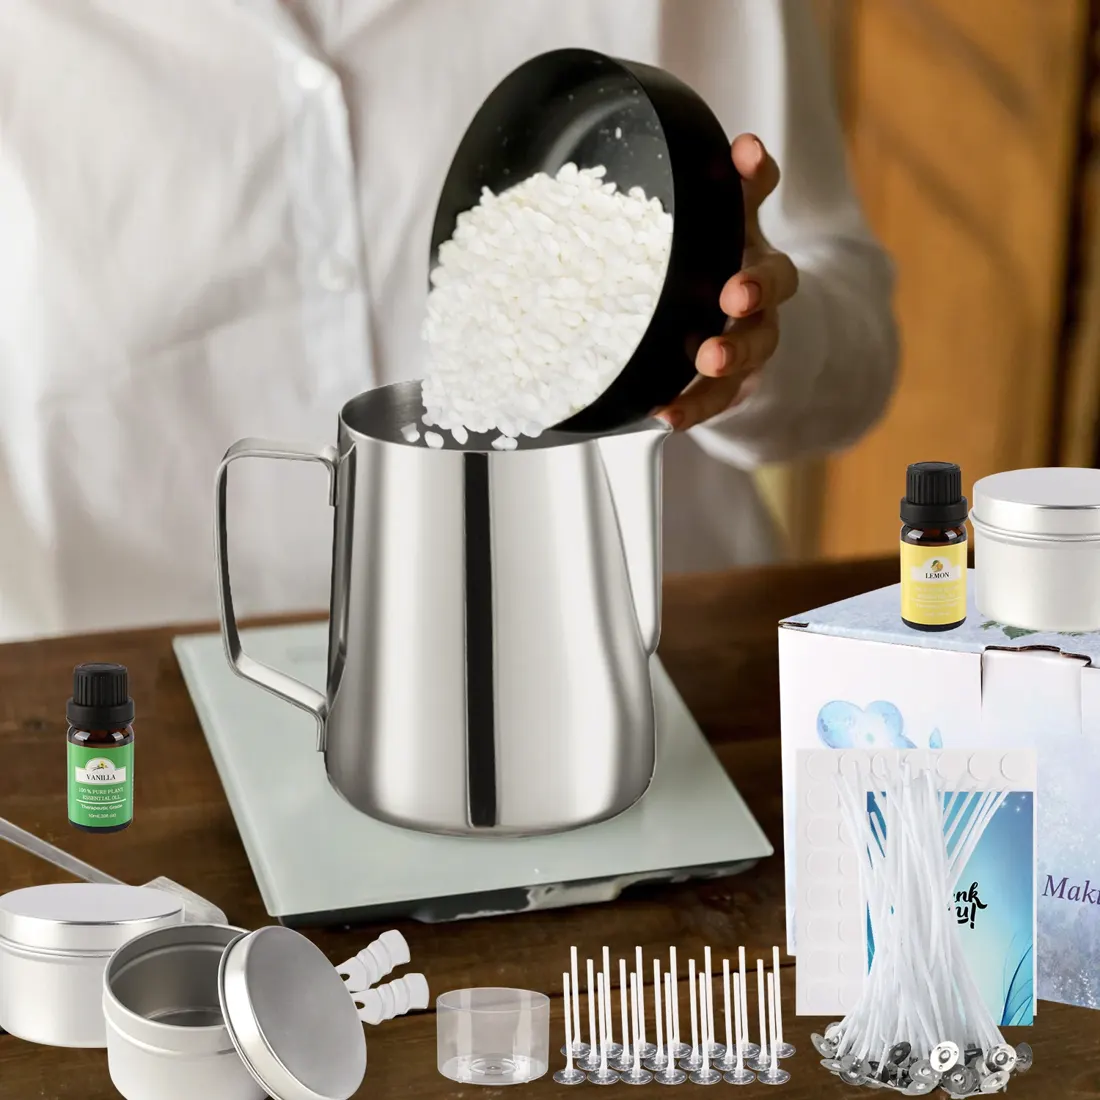
Here is exactly what ships in the Waxwright candle making kit, counted straight off the supplier's printed contents list: one stainless steel melting pitcher, two bags of soy wax, fifty candle wicks plus twenty extra wicks, four candle tins with lids, ten plastic candle jars, two fragrance oils in lemon and vanilla, four color dyes, two wooden centering devices, one stainless steel spoon, fifty-six glue dots, and a user manual.
Read that wick count again, because it changes how you should approach your first session. Seventy wicks against fourteen containers means you can afford to test. If a wick looks too slim once it is burning, you cut it out, melt the wax back down, and try again with a different one. Beginners who buy wax and wicks separately rarely have that margin, and they end up living with a candle that tunnels because replacing the wick feels wasteful. A full breakdown of every component sits on the candle making supplies page.
The containers are small on purpose. The metal tins measure 2.36 inches across and 1.57 inches tall (6 cm by 4 cm), and the plastic jars measure 1.54 inches across and 0.98 inches tall (3.9 cm by 2.5 cm). Small containers reach a full melt pool quickly, which is the single biggest reason first candles behave well. The melting pitcher itself is 3.74 inches wide and 4.21 inches tall (9.5 cm by 10.7 cm), and the whole box measures 8.46 by 5 by 4.9 inches (21.5 by 12.7 by 12.5 cm), so it stores on a shelf between sessions.
Two items are not in the box and you almost certainly own both. The first is a saucepan wide enough to seat the pitcher with water around it. The second is a thermometer, which is optional but useful once you start caring about pour temperature. Everything else, including the spoon and the glue dots, arrives with the kit.
Melting the Wax
The technique has a name, the double boiler, and the reason it is standard in candle making is that water cannot climb past its boiling point at normal pressure. The wax therefore sits in a heat bath that has a ceiling built into it. Put the pitcher on a burner directly and the metal base can run far hotter than the wax needs, which scorches the wax at the bottom and dulls the fragrance you are about to add.
Container soy waxes are commonly cited as melting somewhere in the 115 to 135°F band (46 to 57°C), and blends vary. Your kit ships with a user manual, and the number printed there for your specific wax outranks any range you read online, including this one. If you have no thermometer, the visual cue is reliable enough for a first candle: keep the heat gentle and stop as soon as the last flakes vanish and the liquid looks clear.
Two bags of soy wax is enough volume to work in batches, which is what I recommend. Melt one bag, pour a few containers, and see how they behave before committing the rest. If you want the longer version of why soy behaves differently from paraffin or beeswax in a container, that comparison lives in the candle wax types guide.
Anchoring and Centering the Wick
The kit gives you fifty-six glue dots for exactly this. Peel one, stick it to the underside of the wick tab, and push the tab down onto the container floor with the end of the spoon handle so you get real pressure without burning a fingertip. A wick that lifts off the floor during the pour will float sideways and set at an angle, and an angled wick burns toward one wall of the container.
Then the wooden centering devices take over. They rest across the top of the container and hold the wick vertical while the wax hardens. There are two of them in the box, which means you work in pairs: pour two containers, wait, move the devices, pour two more. That pacing feels slow the first time and turns out to be the right rhythm anyway, because it stops you pouring fourteen containers before discovering something is off.
Wick choice is the one variable that separates a candle that burns cleanly from one that misbehaves, and it is driven by container width more than anything else. Both container sizes in this kit are narrow, which is forgiving. The reasoning, and what to do when you graduate to wider vessels, is laid out in the candle wick size guide.
Adding Fragrance Oil and Dye
The kit includes two fragrance oils, lemon and vanilla, and four color dyes. That is a deliberately small palette and it is more than enough for a first run. Lemon and vanilla also happen to be two of the easiest scents to judge, because you already know what both should smell like in a room, which makes it obvious whether your scent load is working.
Stirring is the part people rush. Fragrance oil and melted wax are two liquids that will happily sit in separate layers if you give them the chance, and a lazy stir shows up two weeks later as a candle with almost no scent throw. Use the stainless steel spoon, keep the motion slow and steady rather than fast and splashy, and give it the full two minutes. Splashing folds air into the wax and air is what produces the pitted surface you see on rushed candles.
Dye goes in at the same stage. Add it a little at a time, because melted wax always looks darker in the pitcher than the finished candle looks on a shelf. If you want a deeper read on how scent load, oil type, and cure time interact, the candle fragrance oil guide covers it. And if you are making these with kids or as a group project, the pacing notes on the adult candle making kit page are worth a look first.
Pouring, Cooling, and Curing
Pouring slowly matters for one reason: a fast pour drives air into the wax and knocks the wick off center. The spout on the stainless pitcher exists to give you a controlled stream, so use it. Aim at the wall of the container, let the wax run down and pool from the bottom up, and stop short of the rim so the finished candle has a lip.
Cooling should be boring. Do not move the containers, do not put them in the refrigerator to speed things up, and do not sit them next to an open window. Fast or uneven cooling is what produces cracks across the surface and frosting up the sides. A drafty windowsill will do more damage to a candle's surface than anything you did while melting.
Then comes curing, which is simply time. Most soy candle makers wait one to two weeks before lighting a new candle, because the wax and the fragrance oil keep binding well after the surface has set. A soy candle lit the same evening it was poured will smell weak, and the usual conclusion is that the fragrance oil was bad when the real answer is that it was early. If soy specifically is what you are working with, the dedicated walkthrough is how to make soy candles.
When the cure is done, the first burn sets the pattern for every burn afterward. Light it and leave it lit until the melted pool of wax reaches the edges of the container all the way around. Soy has a memory, and a first burn that stops early teaches the candle to tunnel for the rest of its life.
Fixing the Four Problems Beginners Hit
Tunneling. The flame burns a narrow shaft down the middle and leaves a ring of unused wax on the walls. The cause is a first burn that was cut short, or a wick that is too slim for the container. The fix on your next pour is a longer first burn, and if that does not solve it, a different wick from the spares. This is exactly what the twenty extra wicks are for.
Sinkholes. The surface looks fine, then a cavity opens around the wick as the candle cools. Soy contracts as it hardens and the contraction has to go somewhere. The standard answer is a small second pour of leftover wax once the first has set, which is another reason to melt in batches and keep a reserve in the pitcher.
Weak scent throw. Either the fragrance went in too hot, went in too cold, was under-stirred, or the candle has not cured long enough. Work through those four in order before you blame the oil. In my experience the answer is the cure roughly half the time.
A drowning wick. The flame shrinks and swims in a deep pool of liquid wax. That is an undersized wick for the amount of wax it has to consume. Swap to a spare and, if you are pouring the wider tins, keep the fill just below the rim so the flame is never fighting a deep pool from the start.
None of this requires equipment beyond what is in the box. The kit sells for $49.99, marked down from $69.99, ships free in 8 to 10 business days, and carries a 30 day guarantee. The source listing for this kit shows 4.6 out of 5 across 120 verified reviews with over 900 units sold, according to verified supplier listing data from 2026. What buyers actually wrote is collected on the reviews page, and the way each kit gets checked against the supplier's printed contents before it goes on this site is documented on how we test. If you want the soy-specific version of this whole workflow, start at the soy candle making kit page.